It is one of the most frustrating paradoxes of compact living: your entire home could fit inside a single room of a suburban house, yet the Wi-Fi somehow dies between the living area and the bedroom. The culprit is rarely distance — it is the dense concrete, solid brick, or steel-reinforced walls that older buildings and many city flats are made of, materials that swallow wireless signals far more aggressively than the drywall most routers were designed around.
The encouraging news is that thick walls are a solvable problem, and solving it in a snug floor plan is cheaper and easier than in a large house. This guide explains exactly why masonry murders your signal, how to diagnose your specific dead zones in ten minutes, the free fixes that often work immediately, and — when hardware is genuinely needed — how to choose between mesh, powerline, extenders, and Ethernet without wasting money or cluttering your carefully curated space.

Short on time? The video below compresses this entire guide into under ninety seconds: why concrete and brick walls block Wi-Fi signals, where to position your router for maximum coverage, and which upgrade — mesh or powerline — actually solves a stubborn dead zone. Watch it first, then use the detailed sections that follow as your step-by-step playbook.
With the big picture in mind, the guide below digs into the details the video could only touch on: how to map your dead zones with a free analyzer app, the exact router placement and band-assignment tricks that cost nothing, and a full comparison table of mesh, powerline, extenders, and Ethernet for wall-heavy floor plans.
Wireless internet behaves like light from a lamp: it radiates outward, weakens with distance, and is blocked or absorbed by whatever stands in its path. In a typical modern build with hollow drywall partitions, the signal passes through nearly untouched. But concrete, brick, stone, plaster over metal lath, and tile behave more like thick curtains drawn around that lamp. Add the metal rebar inside reinforced concrete — which acts as a partial Faraday cage — and a single load-bearing wall can erase more signal strength than thirty meters of open air. Understanding this single fact reframes the whole problem: you are not fighting distance, you are fighting materials, and the winning strategies route the signal around obstacles rather than trying to overpower them.
Why Thick Walls Destroy Wi-Fi Signals in Compact Homes
Wi-Fi operates on radio frequencies — primarily 2.4 GHz, 5 GHz, and, on newer routers, 6 GHz. The higher the frequency, the faster the potential speed, but also the worse the penetration through solid matter. A 5 GHz signal that delivers blazing speeds across an open room can lose the majority of its strength passing through one thick masonry wall; pass it through two, and there is often nothing usable left on the other side.
Different materials punish the signal to very different degrees. Drywall and wood shave off only a little. Solid brick takes a substantial bite. Poured concrete is worse still, and reinforced concrete — the standard in many apartment towers and older urban buildings — is the harshest of all, because the embedded steel mesh reflects and scatters radio waves on top of what the concrete absorbs. Tile, mirrors, metal appliances, and even large water-filled objects like aquariums and water heaters compound the effect, which is why bathrooms and kitchens so often sit at the center of dead zones in cozy dwellings.
There is also an invisible enemy: congestion. Dense residential buildings can have dozens of networks competing for the same channels, and interference weakens an already wall-battered signal further. This is why two identical flats with identical routers can have wildly different Wi-Fi experiences — and why the diagnosis step below is worth ten minutes of your time before you spend a single riyal, dollar, or euro on hardware.
Step One: Map Your Dead Zones Before Buying Anything
Guessing leads to wasted money; measuring leads to targeted fixes. Grab your phone, install a free Wi-Fi analyzer app (or simply use a speed-test site), and walk your home slowly. Record the signal strength and speed in each zone: next to the router, each corner of the main living area, the bedroom, the bathroom, the kitchen nook, and anywhere you actually use devices — the sofa, the bed, the desk.
What you are building is a rough heatmap. In a tight footprint this takes minutes, and the pattern it reveals almost always tells you which wall is the villain. A strong signal that falls off a cliff on the far side of one specific wall confirms a penetration problem; a signal that is mediocre everywhere, even near the router, points instead to channel congestion or an aging router. These two diagnoses lead to completely different solutions, which is exactly why the map matters.

Signs Your Walls — Not Your Router — Are the Problem
- The cliff-edge pattern — full bars in one room, one or zero bars immediately on the other side of a specific wall.
- 5 GHz vanishes but 2.4 GHz survives — the lower band penetrates better, so this gap is a classic masonry signature.
- Speeds are excellent right beside the router — ruling out your internet plan and the router’s raw performance.
- Video calls drop in one room only — consistent location-based failure rather than random time-based failure.
- Moving the router even one meter changes everything — a sign the signal path, not the hardware, is the bottleneck.
Free Fixes First: Placement, Bands, and Channels
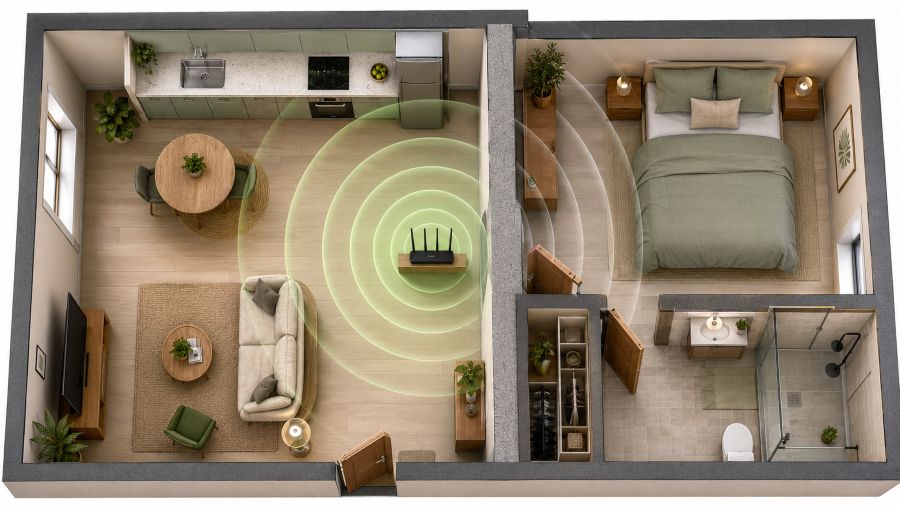
Before spending anything, exhaust the zero-cost options — in wall-heavy homes they resolve a surprising share of cases. Start with placement, the single highest-impact free change. Routers tucked inside TV cabinets, behind the sofa, on the floor, or in the entry closet where the internet line happens to enter are fighting with one hand tied. Move the router to a central, elevated, open position: a shelf at roughly chest height, clear of metal objects, mirrors, the refrigerator, the microwave, and that aquarium. In a petite floor plan, centrality is a superpower — from the middle of the home, the signal may only need to cross one wall to reach anywhere instead of two or three.
Next, exploit your frequency bands deliberately. Rename the 2.4 GHz and 5 GHz networks separately in your router settings (for example, “Home-Fast” and “Home-Far”) and assign devices by location: the smart TV and desk computer near the router join the 5 GHz network for speed, while the bedroom phone charger-side scrolling, the smart speaker behind the concrete wall, and balcony devices join 2.4 GHz for its superior wall penetration. This single change often transforms a “broken” bedroom connection into a perfectly stable one.
Finally, fix congestion. In your router’s admin panel, switch the 2.4 GHz band away from crowded channels — 1, 6, and 11 are the only non-overlapping options, and your analyzer app will show which is least used by neighbors. Update the router’s firmware while you are in the settings, and reboot it on a schedule; both steps cost nothing and quietly resolve a class of flakiness that gets misdiagnosed as a wall problem.
Smart Small Space Tip: Routers do not have to be eyesores. A slim floating shelf at picture-rail height, painted to match the wall, turns the ideal router position into a deliberate design feature — and lifts the signal above sofas, headboards, and other furniture that absorbs it at floor level. Just never enclose the router in a closed cabinet; ventilation matters for performance and longevity.
Hardware That Beats Thick Walls: Choosing the Right Upgrade
If the free fixes leave a stubborn dead zone, the right hardware depends on your layout, your budget, and whether you rent. The crucial principle for masonry-heavy homes: choose solutions that route data around walls, not devices that simply shout louder at them. Here is how the main options compare in a snug, wall-heavy floor plan.
| Solution | How It Beats Walls | Typical Cost | Best For |
|---|---|---|---|
| Mesh Wi-Fi (2-node kit) | Nodes relay signal through doorways and open paths, bypassing masonry | $100–$250 | Whole-home fix; renters; the most seamless experience |
| Powerline adapter pair | Sends data through electrical wiring — walls become irrelevant | $40–$100 | One dead room; desks and TVs that can take a cable |
| Wi-Fi extender / repeater | Rebroadcasts signal — only works if placed where signal is still strong | $25–$60 | Tight budgets and mild dead zones; weakest option vs. concrete |
| Flat Ethernet cable run | Physical connection; zero loss, zero interference | $10–$25 | Stationary gear: desk PC, console, smart TV |
| Router upgrade (Wi-Fi 6/7) | Better band management and efficiency, though physics of walls still applies | $80–$300 | Routers older than ~5 years; congested buildings |
For most wall-plagued compact dwellings, the contest comes down to mesh versus powerline. Choose a two-node mesh kit when you want one seamless network everywhere and your layout offers a relay path — place the main node by the modem and the satellite where it still receives a decent signal, such as just inside the doorway of the problem room, so it can hop the signal around the concrete rather than through it. Choose powerline adapters when one specific room is the issue and the devices there (a desk setup, a TV, a console) can accept a wired or short-range connection; data traveling through your electrical circuits simply does not care how thick the walls are. Be more skeptical of cheap repeaters: a repeater placed inside the dead zone has nothing to repeat, and one placed before the wall still has to punch through it — the exact battle you already lost.

Renter-Friendly and Decor-Friendly Implementation
Living small usually means living rented, and it always means every visible object competes for precious visual space. Fortunately, none of the effective solutions requires drilling through walls or signing away your deposit. Flat Ethernet cables — about the thickness of a ribbon — slip under rugs, along skirting boards, and through door frames almost invisibly, and adhesive cable raceways painted to match your walls make even a longer run disappear. Powerline adapters occupy nothing but an outlet. Modern mesh nodes are deliberately designed as quiet, sculptural objects in white or fabric finishes that sit comfortably on a bookshelf next to your plants rather than screaming “networking equipment.”
Position hardware where it doubles as function and decor discipline: a mesh satellite on the bedroom dresser also becomes the natural charging-and-tech corner, keeping cables corralled in one zone instead of scattered across your limited surfaces. And if your building’s internet socket forces the modem into an awkward corner, remember that the modem and the Wi-Fi source no longer need to live together — a single flat cable from the modem to a centrally placed mesh node relocates your entire wireless heart to the ideal spot.
Future-Proofing: Do Wi-Fi 6E and Wi-Fi 7 Help With Walls?
Newer standards bring real benefits — but it is important to understand which ones. Wi-Fi 6 dramatically improves how a router juggles many devices at once, which matters in smart-home setups where plugs, bulbs, speakers, and sensors crowd the network. Wi-Fi 6E and Wi-Fi 7 add the 6 GHz band: gloriously fast and interference-free, but with even worse wall penetration than 5 GHz. In a masonry-heavy home, 6 GHz is a same-room luxury, not a dead-zone cure.
The genuinely wall-relevant advance is in mesh backhaul: Wi-Fi 7 mesh systems can bond multiple bands simultaneously between nodes, making the node-to-node relay faster and more resilient — which strengthens exactly the “route around the wall” strategy this whole guide is built on. The practical takeaway: upgrade for mesh quality and device capacity, not for headline speed numbers, and let the 2.4 GHz workhorse keep handling whatever must pass through concrete.
FAQ: Fixing Wi-Fi Around Thick Walls in Compact Living Spaces
Why is my Wi-Fi so weak even though my flat is tiny?
Distance is only one factor in Wi-Fi strength — wall material matters far more. A single thick concrete or brick wall can absorb more signal than thirty meters of open air, so even a snug studio can have dead zones if the router sits behind dense masonry, a metal-framed wall, or a bathroom full of tile and pipes. Repositioning the router and switching problem devices to the 2.4 GHz band usually delivers an immediate improvement.
Is a mesh system overkill for a one-bedroom flat with thick walls?
Not when masonry is involved. Mesh systems are sized by obstacle difficulty, not just square meters. A two-node mesh kit placed so each node has near line-of-sight to the other — for example through a doorway rather than through the wall — routes the signal around concrete instead of forcing it through, which a single powerful router cannot do. For one stubborn dead zone, a two-pack is plenty; skip the three-pack.
Do powerline adapters work in older buildings?
Powerline adapters send data through your electrical wiring, so performance depends on the building’s circuits. In many older buildings they work well and completely bypass thick walls, but results degrade if the two outlets sit on different circuits or the wiring is very old. Buy from a retailer with easy returns, test the exact outlets you plan to use, and avoid power strips — adapters should plug directly into the wall.
Should I use 2.4 GHz or 5 GHz with concrete walls?
The 2.4 GHz band penetrates dense materials significantly better than 5 GHz, so devices on the far side of a thick wall often hold a more stable connection on 2.4 GHz despite its lower top speed. A practical rule: keep high-bandwidth devices near the router on 5 GHz (or 6 GHz with Wi-Fi 6E/7), and let distant or wall-blocked devices use 2.4 GHz.
Final Thoughts: Strong Signal, Small Footprint
Thick walls feel like an unbeatable opponent because they are literally part of the building — but the entire strategy of modern home networking is built on never fighting them head-on. Diagnose first with a ten-minute signal walk, claim the free wins of central elevated placement, deliberate band assignment, and a quiet channel, and only then spend money — on a two-node mesh kit when you want seamless coverage everywhere, or a powerline pair when one room needs rescuing.
The compact footprint that once seemed to make the problem absurd is actually your advantage: shorter distances mean a single well-placed node or one discreet flat cable can blanket the entire home. Within an afternoon, the bedroom video calls stop freezing, the kitchen speaker stops stuttering, and your cozy dwelling delivers the one modern utility that should never depend on which side of a concrete wall you happen to be standing.