In a small apartment, every square foot has to multitask. The same corner that serves as your office by day becomes your dinner spot by evening and your wind-down zone by night. Furniture rarely moves, but the mood of a room can—and the fastest, most affordable way to change it is light. With well-designed smart lighting scenes, a single compact room can shift from focused and energizing to soft and restful in the time it takes to tap your phone.
This guide walks you through building four essential smart lighting scenes for small apartments—Work, Relax, Sleep, and Hosting—along with the exact color temperatures, brightness levels, and gear that make each one feel intentional. Whether you are working with a studio, a one-bedroom, or a tight open-plan layout, these scenes will help your space do more without you adding a single piece of furniture.
Before diving into individual scenes, it helps to understand why lighting carries so much weight in a small home. In a large house, you can dedicate entire rooms to single purposes—a study, a den, a guest lounge. In a small apartment, you do not have that luxury, so light becomes the tool that signals which “mode” your space is in. The right scene tells your brain it is time to focus, to relax, or to sleep, even when the walls around you have not moved an inch.
Why Smart Lighting Scenes Matter More in Small Apartments
Smart lighting scenes are saved combinations of brightness, color temperature, and color that you can recall instantly. Instead of fiddling with three different lamps and a dimmer every time your needs change, you tap one button and the whole room reconfigures. In a small apartment, this convenience is more than a luxury—it is what makes a multi-purpose space genuinely livable.
Consider a typical studio. A single overhead fixture casting harsh white light makes the room feel like an office at midnight and a clinic at dinner. By contrast, layered lighting—a mix of overhead, lamp, and accent sources—lets you sculpt the room. Bouncing light off the ceiling makes low ceilings feel taller. Pools of warm light in the corners create depth that a flat overhead glare destroys. These effects matter most when there is little space to spare, because the eye reads a well-lit small room as calm and considered rather than cramped.
The Three Variables Behind Every Scene
Once you understand three simple variables, building any scene becomes straightforward. Each one shapes how a room feels, and the magic is in combining them.
- Color temperature — measured in Kelvin (K). Lower numbers (2200K–2700K) glow warm and amber, like candlelight. Higher numbers (4000K–5000K) read cool and crisp, like daylight.
- Brightness — the intensity of the light, usually adjustable from 1% to 100%. High brightness energizes; low brightness soothes.
- Color — optional, but full-color bulbs let you add accent hues for hosting or seasonal moods without buying new fixtures.
The Work Scene: Focused, Bright, and Productive
If you work or study from home, the Work scene is the one you will lean on most. The goal here is alertness and clarity, so this scene leans cool and bright. Aim for a color temperature between 4000K and 5000K—close to natural daylight—and push brightness to 80–100%. This combination keeps you awake, reduces eye strain during long screen sessions, and signals to your brain that it is time to concentrate.
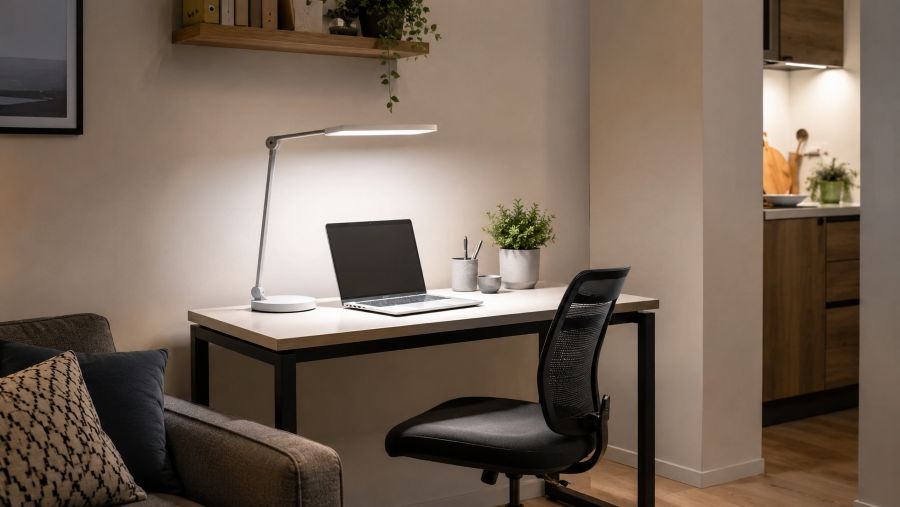
In a small apartment, your desk often sits in a corner or against a wall, which means glare and shadows are a real risk. To avoid this, combine a bright overhead or main light with a directional task lamp positioned to the side of your screen rather than behind it. A smart desk lamp that lets you tune both brightness and temperature is one of the highest-impact purchases you can make for a compact work setup, because it gives you focused light exactly where you need it without flooding the entire room.
Fine-Tuning the Work Scene
Natural light shifts throughout the day, and your Work scene should account for that. In the early morning, a slightly warmer 4000K eases you into the day. By midday, when outdoor light is strongest, 5000K keeps everything feeling crisp. If you find yourself squinting or getting headaches, your brightness is likely too high relative to your screen—dial it down in small increments until the contrast feels comfortable. The beauty of a saved scene is that once you find your ideal balance, you never have to hunt for it again.
The Relax Scene: Warm, Soft, and Unwinding
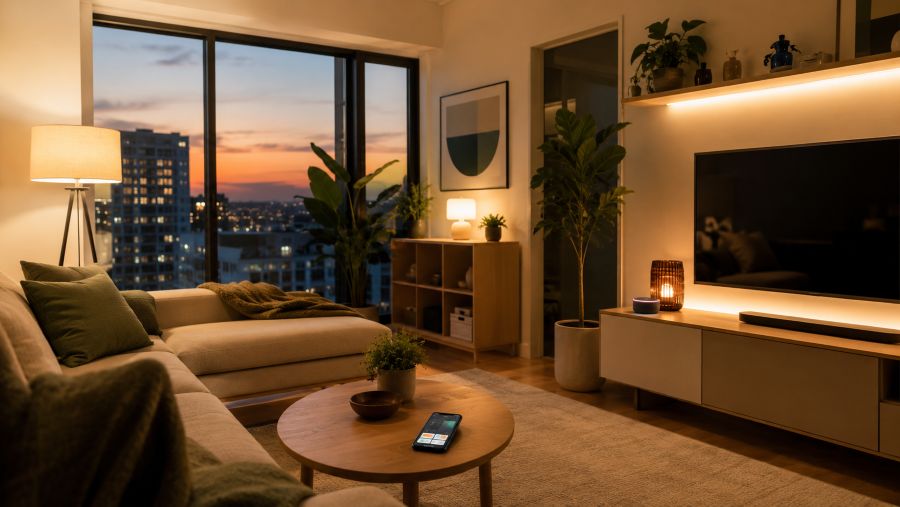
When the workday ends, the Relax scene takes over. This is where smart lighting truly shines in a small apartment, because the transition from “office” to “living room” happens entirely through light. Drop the color temperature to a cozy 2400K–2700K and bring brightness down to roughly 40–60%. The result is a warm, golden glow that instantly softens the room and tells your nervous system it is time to decompress.
The secret to a great Relax scene in a small space is layering rather than a single dimmed overhead light. One ceiling fixture turned low looks dull and flat, but a combination of a floor lamp, a table lamp, and perhaps a hidden LED strip behind a shelf creates depth and warmth. These small pools of light draw the eye around the room and make a tight space feel layered and intentional. Because you are using less overall light, this scene is also gentle on your evening energy bill.
Smart Small Space Tip: Hide an inexpensive smart LED strip behind your TV, along the top of a bookshelf, or under a floating cabinet. This indirect “bias lighting” reduces screen glare, adds a soft halo of color, and makes a small room feel dramatically more expensive—without taking up a single inch of floor or surface space.
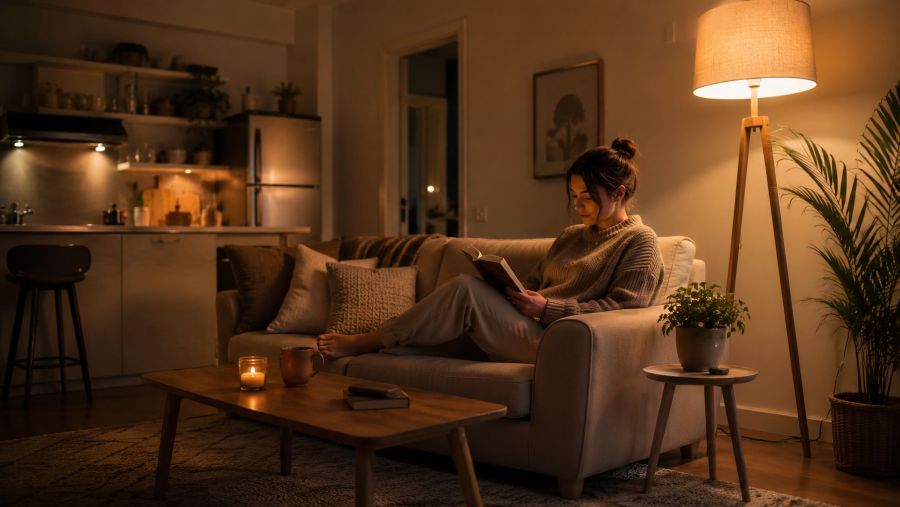
The Sleep Scene: Dim, Amber, and Restful
The Sleep scene is the gentlest of the four, designed to ease you toward rest rather than light the room for activity. Here, color temperature should drop as low as your bulbs allow—ideally 2200K or warmer—and brightness should sit around 10–20%. Crucially, this scene should contain almost no blue light, because blue wavelengths suppress melatonin and trick your brain into thinking it is still daytime. A deep amber glow has the opposite effect, helping your body prepare for sleep.
In a studio apartment where your bed shares a room with everything else, the Sleep scene does double duty: it dims the entire space at once so the room stops feeling like a workspace and starts feeling like a bedroom. Many people pair this scene with a gradual “sunset” fade, where the lights slowly dim over 15 to 30 minutes. This gentle wind-down is far kinder to your eyes and your sleep cycle than flipping a switch to total darkness, and it removes the temptation to keep scrolling under bright light.
If you wake during the night, a Sleep scene also prevents the jarring shock of full brightness. Set a low, warm “night light” level—around 5%—that lets you move safely without fully waking yourself or a partner. Smart bulbs with motion or voice activation make this effortless, so you never have to fumble for a switch in the dark.
The Hosting Scene: Inviting, Layered, and Dynamic
When friends come over, your small apartment becomes a gathering space, and the Hosting scene helps it rise to the occasion. This scene sits between Work and Relax in brightness—around 50–70%—with a flattering warm-neutral temperature near 2700K–3000K. The aim is light that feels welcoming and lively without being either too clinical or too dim to see faces and food clearly.
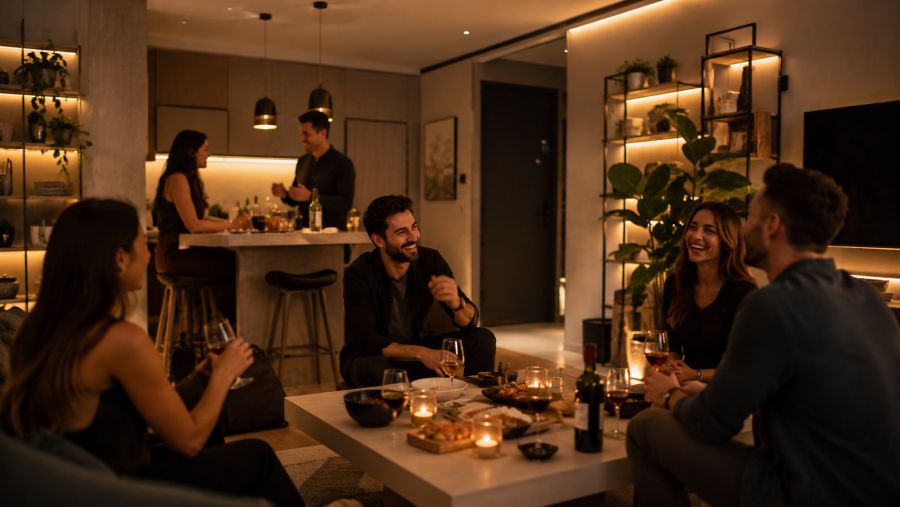
This is where full-color bulbs and strips earn their keep. A subtle accent color—a hint of amber, soft pink, or muted blue—on a shelf strip or behind the sofa adds personality and energy that elevates the whole room. The trick is restraint: one or two accent touches feel curated, while a rainbow of colors quickly looks chaotic in a small space. Keep your main living and dining light warm and functional, and let the accents do the decorating.
For extra flexibility, consider splitting your Hosting scene into a “dinner” version that is slightly brighter for eating and a “lounge” version that dims down once the plates are cleared and conversation takes over. With smart lighting, switching between the two is a one-tap affair, so the mood of your gathering can evolve naturally through the evening.
Smart Lighting Scene Settings at a Glance
The table below summarizes the recommended settings for all four core scenes. Treat these as a reliable starting point, then adjust to match your bulbs, your room, and your personal preferences. Small tweaks make a big difference, so do not be afraid to experiment.
| Scene | Color Temperature | Brightness | Best For |
|---|---|---|---|
| Work | 4000K – 5000K (cool white) | 80% – 100% | Focus, study, video calls, daytime tasks |
| Relax | 2400K – 2700K (warm) | 40% – 60% | Reading, TV, evening downtime |
| Sleep | 2200K or warmer (amber) | 10% – 20% | Winding down, bedtime, night light |
| Hosting | 2700K – 3000K (warm-neutral) | 50% – 70% | Dinners, gatherings, socializing |
Choosing the Right Smart Lighting Gear for a Small Apartment
You do not need an expensive whole-home system to enjoy great lighting scenes. In fact, a small apartment is the ideal place to start, because a few well-chosen devices cover the entire space. Begin with what you already have—your main fixtures and existing lamps—and add smart bulbs where they will make the biggest difference.
Smart bulbs are the easiest entry point. Tunable-white bulbs let you control temperature and brightness, while full-color bulbs add accent options for hosting. Place them in your most-used lamps first. LED light strips are the next best investment for a compact home, since they add indirect, space-enhancing glow behind shelves, TVs, and headboards without occupying any surface. A smart plug can even bring a “dumb” lamp into your scenes, turning an existing favorite into a controllable light source.
As for control, decide early whether you want a hub-free or hub-based setup. For a handful of lights in one or two rooms, hub-free Wi-Fi or Bluetooth bulbs are simpler and cheaper to start with. If you later expand to many devices or want voice control and faster response, a hub is a worthwhile upgrade. Either way, build your four scenes inside the companion app, give them clear names, and—if your system supports it—assign them to a physical smart button or a voice command so changing the room’s mood never requires hunting for your phone.
A Simple Setup Order for Beginners
If you are starting from zero, this sequence keeps things manageable and affordable. Add devices one layer at a time rather than all at once.
- Swap your two most-used lamp bulbs for tunable-white or full-color smart bulbs.
- Add one LED strip for bias lighting behind a TV, shelf, or headboard.
- Build your Work and Relax scenes first, since you will use them daily.
- Add Sleep and Hosting scenes once the daily two feel natural.
- Assign each scene to a button, schedule, or voice command for one-tap control.
FAQ: Smart Lighting Scenes for Small Apartments
How many smart lighting scenes do I really need in a small apartment?
For most small apartments, four core scenes cover almost every situation: Work, Relax, Sleep, and Hosting. Starting with these four prevents decision fatigue while still giving your space a distinct mood for every part of the day. You can always add seasonal or specialty scenes later, but four is the sweet spot for a compact home.
Do smart lighting scenes work without a hub?
Yes. Many modern smart bulbs and light strips connect directly over Wi-Fi or Bluetooth and let you build scenes through their app with no separate hub. A dedicated hub becomes worthwhile only when you have many devices, want faster response times, or need them to keep working when your internet drops. For a small apartment with a handful of lights, hub-free setups are usually enough.
What color temperature is best for a work lighting scene?
A cool, neutral-to-bright white in the 4000K to 5000K range works best for focus and productivity. This range mimics daylight, helps you stay alert, and reduces the drowsy feeling that warm tones can cause during long tasks. Keep brightness high, around 80 to 100 percent, to minimize eye strain while you work.
Can smart lighting scenes really make a small apartment feel bigger?
Lighting cannot change square footage, but layered scenes can dramatically change how spacious a room feels. Bouncing light off walls and ceilings, using warm pools of light to define zones, and avoiding a single harsh overhead fixture all make a compact space feel more open and intentional rather than cramped and flat.
Bringing It All Together
Smart lighting scenes are one of the rare upgrades that improve a small apartment in every dimension at once—comfort, function, and atmosphere—without demanding any extra floor space. By defining just four scenes for Work, Relax, Sleep, and Hosting, you give a single compact room the flexibility of several, all controlled with a tap. Start with two everyday scenes, layer in a few affordable bulbs and a light strip, and refine the settings until each one feels exactly right for the way you live.
The best part is how personal this becomes over time. Your ideal “relax” glow will differ from someone else’s, and your space will tell you what it needs the moment you start paying attention to light. Treat these scenes as a foundation, keep experimenting, and your small apartment will reward you with a calmer, more capable, and far more inviting place to live.

ADeL A.A
ADeL A.A is a home décor and space optimization writer who believes every square foot matters. He spends his time researching, testing, and comparing smart storage ideas, multi-functional furniture, and practical layout solutions — always searching for the best ways to make compact homes feel bigger, brighter, and better organized.
View all articles by ADeL A.A →